This tutorial will show you how to publish a page on the Frontend of your ChurchBox instance
In the Admin area, click on 'Content' and 'Pages' from the dropdown that appears.
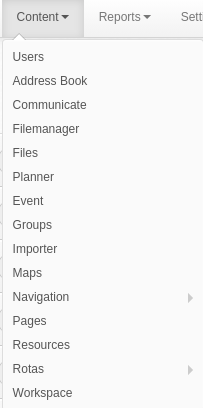
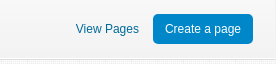
This will take you to the index page for the pages in your ChurchBox instance. Click on 'Create Page'
You can then fill out the form shown. Give the page a title, a slug (this will form part of the url from which the page can be accessed so please use only alphanumeric characters and hyphens).
Setting the status as 'Published' will show the page on the frontend. You can set to 'Draft' to hide the page until it's ready to be published.
The Secure field allows you to choose whether the page is visible to logged in users only or if it should be viewable to anyone. You can also choose whether to show the link in the 'Pages' dropdown in the navigation menu for frontend of your ChurchBox instance.
Enter the body of your page in the text editor. Once you're happy, you can click on 'Save'.

To view your page on the frontend, navigate to the frontend of your ChurchBox instance and click on 'Pages' in the site navigation, and click the title of your page.

This is an example of how your page will look on the frontend of your ChurchBox instance:

To share your page in an email or on social media etc. Simply append the page slug to the url of your ChurchBox instance.
e.g. https://yourinstance.churchbox.co.uk/meeting-minutes
Note: If you want to see how the page will look before making the page public, you can set the Status to 'Published', but select 'Hide' in the 'Show link on Frontend' option. You will be able to view the page with the by appending the event slug to the url of your churchbox instance.
ChurchBox: Church Administration powered by Church123
ChurchBox © Copyright 2011 - 2024 | Contact Us